

 Home
Home 

It also seems that the set screws are just for show - or so thought one previous owner. (Yes, I'm kidding.)
Rebuilding U-joints
Moderators: Cal_Gary, T. Highway, Monkey Man, robi
Rebuilding U-joints
First time rebuilding u-joints. Easy enough, in theory. I'm working on my PTO driveshaft. The caps over the knuckle of the joint - should I expect to trash them taking them out? I removed what retaining clips were there  , and none of the caps would budge - packed in with years of grease, dirt, whatever. As I said - never done this before & don't know what is in the "kit" in terms of replacement parts. Of course, I have to get the silly things apart for my local NAPA folks to measure & get me the right kit.
It also seems that the set screws are just for show - or so thought one previous owner. (Yes, I'm kidding.)
It also seems that the set screws are just for show - or so thought one previous owner. (Yes, I'm kidding.)
You can trust your mother, but you can't trust your ground.
-
Master Yota
- MSGT

- Posts: 828
- Joined: Sun Nov 15, 2009 11:50 am
- Location: Prince George BC Canada
- Contact:
Lots of your favorite penetrating lube around the caps and maybe just a little heat around yoke and the caps should come right out. A Propane plumbers torch will usually put out enough heat to get the job done. Don't be afraid to heat and cool the yokes a few times to break the caps free of the grime. Red hot isn't needed - just enough to make your spit sizzle... 
Ray
1953 CDN. M37
1954 CDN. M152
1953 CDN. M37
1954 CDN. M152
Oh, goodie - fire!
I'm going to need the torch (propane, that is) to get the u-joint off of the drive shaft as it is. Hmm ... penetrating oil (and grease) + fire = Olympic torch. How festive! I'll be sure to do this one outside. Thanks for the advice.
You can trust your mother, but you can't trust your ground.

-
Master Yota
- MSGT
- Posts: 828
- Joined: Sun Nov 15, 2009 11:50 am
- Location: Prince George BC Canada
- Contact:
I use WD40 - its not the greatest penetrating lube, but it dosen't flare up alot either. I usually clean all the greasy buildup off before doing anything - otherwise I'm just spraying good lube on dirt, and that does nothing but waste lube!
The longer the lube works, the better - overnight would be best. The socket method works really well, especially if you've got an extra set of hands to hold the sockets, the shaft, and turn the vice! If the vise you have isn't big enough to accomodate the whole socket/shaft setup; then a bottle jack and the underside of your axle will (usually) do the same thing.
The longer the lube works, the better - overnight would be best. The socket method works really well, especially if you've got an extra set of hands to hold the sockets, the shaft, and turn the vice! If the vise you have isn't big enough to accomodate the whole socket/shaft setup; then a bottle jack and the underside of your axle will (usually) do the same thing.
Ray
1953 CDN. M37
1954 CDN. M152
1953 CDN. M37
1954 CDN. M152
I'm not seeing it ...
Maybe not enough coffeeCal_Gary wrote:A good-sized vise and a just-larger socket to press the caps out (and into the socket) works too.
Gary
I have a U-joint where the dust/crap caps are stuck in the recessed portion of the knuckle arm. Like dropping a marble into a test tube - there's nothing to push on from the other side except the "T" in the middle of the joint, but nothing will budge in the disassembly-direction since it's all rusted/frozen together.
I'm guessing that the caps that are stuck just "sit" in the recessed holes and are held in place with the c-clips. The problem is that I removed the c-clips & nothing else budged.
Thoughts?
You can trust your mother, but you can't trust your ground.
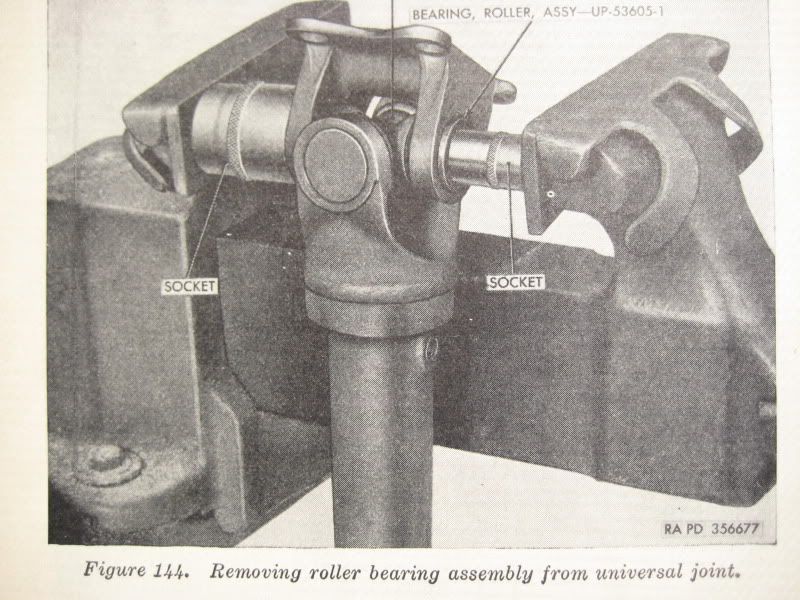
No pix, so let us draw:
[ 0 + -]
<-----
Visualize the outer brackets as your vise jaws. The 0 is your socket that is just bigger than the end cap you are pressing out. The + sign is your U-joint/shaft viewed from the end. The - sign is a socket just smaller than your right-side end cap.
Applying pressure RIGHT TO LEFT compresses the small socket on the right against the right end cap, forcing the entire U-joint LEFT and driving the left side end cap inside the bigger socket on the left. If you get it pretty tight and it still won't budge, rap it with a hammer while under pressure and it should break free, like this:
[0+-]
<-----
Primitive-hope it makes sense.
Gary
Cal_Gary
1954 M37 W/W
MVPA Correspondent #28500
G741.org Forum member since 2004
1954 M37 W/W
MVPA Correspondent #28500
G741.org Forum member since 2004
Now that you know how it's done, I'
ll answer your other question.
Yes, you will trash the end caps as you call them. They are the bearing cups which contain the needle bearings.
When you take them off, you will more than likely spill a bunch of the needles. No problem. There will be new ones in the kit.
The kit will contain the crosspiece (X), 4 bearing cups with the needles already in place, and all necessary retaining clips.
If you know anyone who is familiar with the procedure, have him guide you through the first one. After that, it will be a piece of cake...except for the sweat you work up while doing it, that is.
Anyway, it's one of the easier things to do in maintaining your truck. Enjoy the experience.
"PER ARDUA AD ITER"
-
MSeriesRebuild
- 1SG

- Posts: 2832
- Joined: Sat Oct 20, 2007 4:35 am
- Location: Norwood, NC
- Contact:
The winch shaft joints don't have needles in the caps. Caps slide directly over the journals, precision slip fit without any needle rollers.
Charles Talbert
www.mseriesrebuild.com
www.mseriesrebuild.com
My bad idea - but seriously, who HASN'T considered this?
So technically, I could do something like this (with real good aim):Cal_Gary wrote:No pix, so let us draw:
[ 0 + -]
<-----
Visualize the outer brackets as your vise jaws. The 0 is your socket that is just bigger than the end cap you are pressing out. The + sign is your U-joint/shaft viewed from the end. The - sign is a socket just smaller than your right-side end cap.
Applying pressure RIGHT TO LEFT compresses the small socket on the right against the right end cap, forcing the entire U-joint LEFT and driving the left side end cap inside the bigger socket on the left. If you get it pretty tight and it still won't budge, rap it with a hammer while under pressure and it should break free, like this:
[0+-]
<-----
Primitive-hope it makes sense.
Gary
(.45 cal) (U-joint)
`[=== +
//
Yes, I'm kidding ... at the moment. Still cant get the silly things to budge. Time for heat.
You can trust your mother, but you can't trust your ground.
-
MSeriesRebuild
- 1SG
- Posts: 2832
- Joined: Sat Oct 20, 2007 4:35 am
- Location: Norwood, NC
- Contact:
Re: My bad idea - but seriously, who HASN'T considered this?
Be careful not to use heat in excess, the yokes don't have a lot of meat in them, pretty easy to over-heat and permanently deform them. I like using a press with a little more capability or a u-joint press fixture. We press the majoirity of u-joints on a small 3-ton mechanical press. We also have an 8' tall 30-ton hydraulic press, but that's for heavy stuff.N1VSM wrote:So technically, I could do something like this (with real good aim):Cal_Gary wrote:No pix, so let us draw:
[ 0 + -]
<-----
Visualize the outer brackets as your vise jaws. The 0 is your socket that is just bigger than the end cap you are pressing out. The + sign is your U-joint/shaft viewed from the end. The - sign is a socket just smaller than your right-side end cap.
Applying pressure RIGHT TO LEFT compresses the small socket on the right against the right end cap, forcing the entire U-joint LEFT and driving the left side end cap inside the bigger socket on the left. If you get it pretty tight and it still won't budge, rap it with a hammer while under pressure and it should break free, like this:
[0+-]
<-----
Primitive-hope it makes sense.
Gary
(.45 cal) (U-joint)
`[=== +
//
Yes, I'm kidding ... at the moment. Still cant get the silly things to budge. Time for heat.
Charles Talbert
www.mseriesrebuild.com
www.mseriesrebuild.com
I've used a ball joint press before with good luck. They're available at all the national chain parts stores for their loan a tool deal. it looks like a super heavy duty C-clamp with different size dies. I've used them on non military trucks before with sucess. also you can take it to the truck, and not have to remove the entire drive shaft I.E. carrier bearings, and trans yokes.
Brett
Brett