Page 1 of 2
M37 Cowl Vent Repair
Posted: Fri Jan 29, 2021 11:44 am
by sturmtyger380
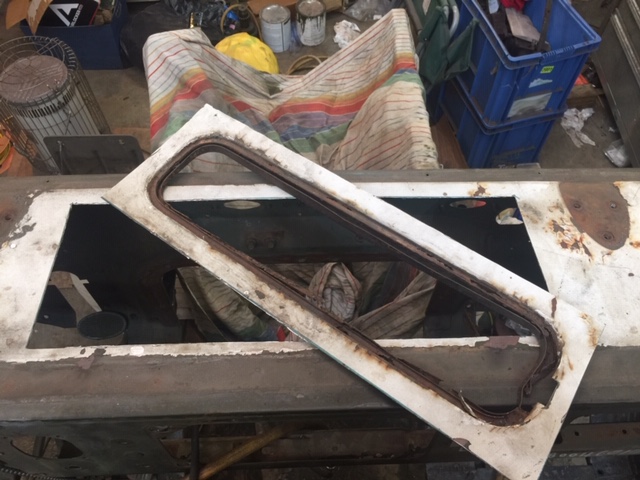
I think it is common on our M37 Trucks that the cowl vent track gets rusted out. You can see once you have cut it out the cowl metal had a turn down and then the track of the vent got welded to that turn down. So, you end up with two channels or slots for water to collect in. The innermost channel has a drain near the front of the cowl. But I can see where that would get clogged easy.
The result is over the years the cowl vent opening gets rusted bad. Here you can see what it looked like when I started poking at it.
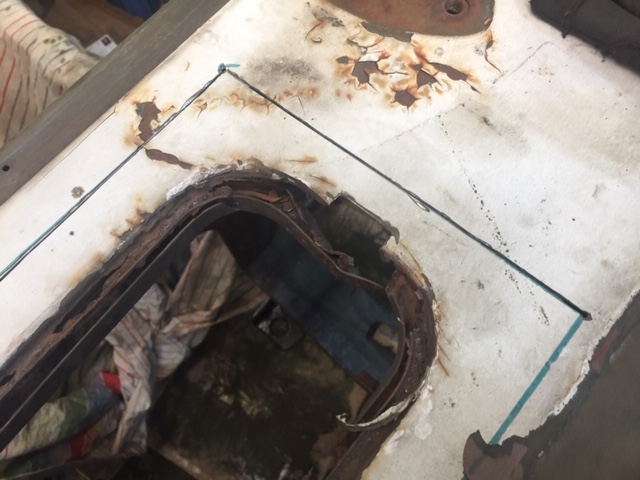
It’s not possible that I can see to work with the rusted vent opening. So, my solution is to cut it out. Then I will create a new opening in a sheet of metal on the workbench and add a lip to the opening that the vent can settle over. I plan on doing something like F18hornetm did in his 1953 M37 post. This link page 6 -
http://www.g741.org/PHPBB/viewtopic.php ... ent+repair
Here is the whole area marked out and ready to cut out:
After going to it with the air cut off tool you can see the removed cowl.
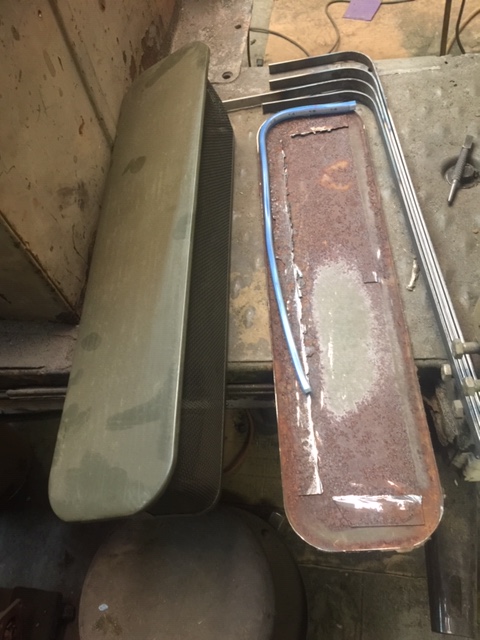
The old vent that was with the truck was also rusted a good bit. It might could have been worked over and used, but some years back I had purchased an NOS vent to use. I cut off all the sides of the old vent only leaving the top cover. I have this flexible moldable plastic tape that I used to bend in the curve of the inside of the vent top. I took this flexible tape to the point of my anvil and marked that spot with blue tape the place on the nose of the anvil that matches the curve of the vent top.

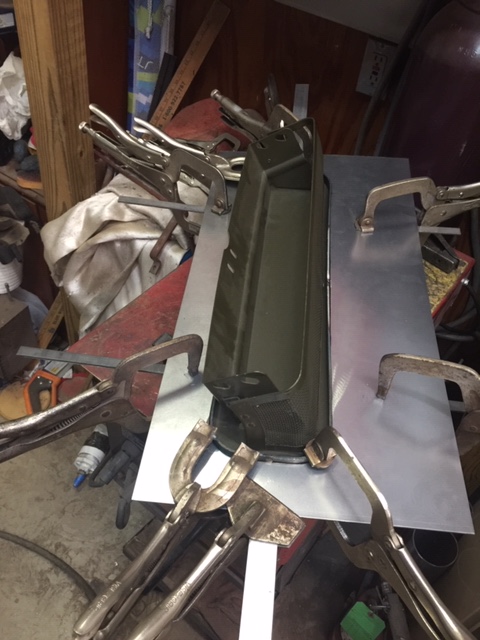
Curve Tool is the blue piece laying in the old vent lid. The NOS vent is to the left. The pieces of metal I heated and bent and will use to make a lip are on the right.
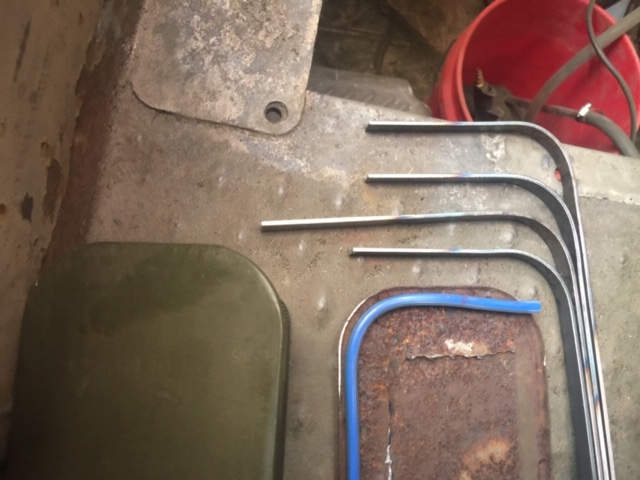
Here is a closeup of the curves I created. The bottom one was the first one I bent and played with it too much and might have to make another one. The next step is to cut the metal pieces up, jig them together and weld them.
More updates as I make progress.
Re: MS37 Cowl Vent Repair
Posted: Fri Jan 29, 2021 3:16 pm
by RCrombie
I bet it’s going to look good when it’s all done. The cowl vent is kind of a tricky piece to replicate but I like how you are coming at it. I have always found sheet metal work to be the kind of work that consumes a lot of time but in the end it always shows when you take your time and do it right.
Keep it up!
Re: MS37 Cowl Vent Repair
Posted: Sat Jan 30, 2021 7:39 am
by Murf
Before you tack it in, you might as well use the room to address the steel over the metal cab frames on each side, inboard of the hinges. The frame pieces will also be heavily rusted and pitted but usually, blasting or a wire disc will get it raw for treatment. You might find pieces of the felt (moisture sponge

) Dodge used as an insulator between the 2 surfaces.
Re: MS37 Cowl Vent Repair
Posted: Sat Jan 30, 2021 1:10 pm
by sturmtyger380
address the steel over the metal cab frames on each side
Yeah those are rusty buggers. I took the siphon sand blaster and blasted all up underneath the cowl. I am glad I had a good mask and filter. It's better under there but still needs some rust killer coating. Then I will have to cut out and weld in some pieces there too.
On to the Cowl! I had some time to work on the new cowl vent today. I took those long curved pieces and measured them and cut them off so they would lay down in the old vent top.
Here are two of the curved pieces ready to weld together:

After doing that twice you end up with to U shaped pieces:

Now to lay the two U pieces into the old vent cover and weld them together:

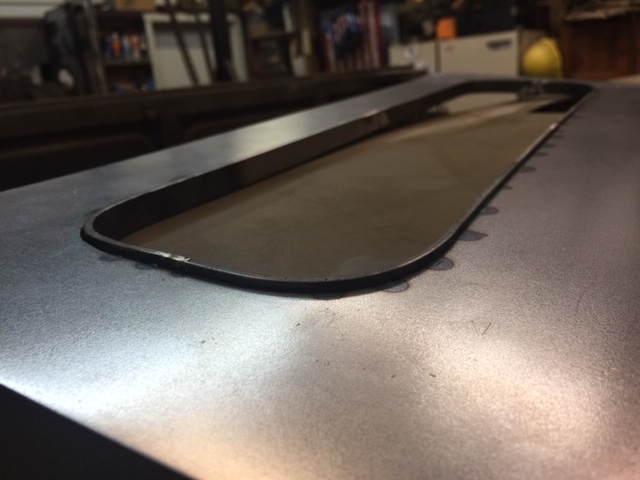
The new flange is a nice fit for the NOS vent:

Time to cut out the vent opening in the new 18 gauge metal, but out of time for today:

Re: MS37 Cowl Vent Repair
Posted: Sat Jan 30, 2021 2:51 pm
by greeno
Awesome. Thank you so much for documenting this.
Re: MS37 Cowl Vent Repair
Posted: Mon Feb 01, 2021 1:11 am
by Cal_Gary
My goodness that is some fine craftsmanship Sturm-nice job!
Gary
Re: MS37 Cowl Vent Repair
Posted: Mon Feb 01, 2021 6:16 am
by sturmtyger380
Time to take on cutting the center out of the metal panel. Since I want it to be a close fit between the flange and the panel, I used the small Dremel type air tool. This took quite some time as you have to make many passes over a cut before it goes through. Plus, there is the time to change the small disks. I used about 5 disks for this cutout. I could have used the plasma cutter but using that you can make a big mess if you can’t control the placement of the jet.

Once the centerpiece was out there was lots of grinding still left to do to get the flange to fit correctly. I picked a new flap disk for the hand grinder and that worked well. It was aggressive enough to cut down the metal but still allowed control. There are a few gaps in the fitment, but I am liking it.


I placed the NOS vent into the opening, and it looks good. It will not be flush with the cowl but everyone knows there is a vent there so I will be okay. Now I have to figure out a way to clamp the flange in place for tack welding.

I have had enough of fiddling with the flange for Sunday. After you work with something for a while you just have to put it down and come back later. Then your mind will be fresh and maybe you have thought of something new to try by then.
Re: MS37 Cowl Vent Repair
Posted: Mon Feb 01, 2021 6:02 pm
by m-37Bruce
That is some great fab work, I was lucky, my vent was in great condition.
Sometimes you just gotta walk away!
Re: MS37 Cowl Vent Repair
Posted: Tue Feb 02, 2021 5:30 am
by sturmtyger380
Re: MS37 Cowl Vent Repair
Posted: Thu Feb 11, 2021 10:34 am
by sturmtyger380
We had some nice weather but now back to working on the cowl vent.
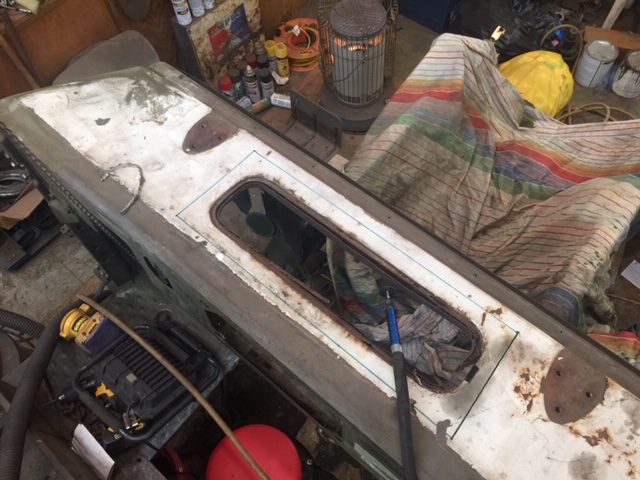
I needed to have some way to try and line up the new cowl piece, so I put the old piece back in and held it with two panel clamps. Then I used a marker to try and make a guide for the new vent.

Then I had to mark on the new piece where to cut it down to size for the opening. I used the side grinder with the flap disk on it to get it to size.

I temporarily mounted the vent panel in with the panel clamps to see how it aligned. Now it’s a different size because the lip is matching the inside of the vent cover, so I put the vent in and moved the holder arms up to the vent mounting holes. This showed I had to remove more metal on the front of the panel to move the whole panel forward in the cowl.
Here is the new piece held in place by body panel clamps

Once I was happy with that, I used the same flat pieces of metal I used to make the lip and cut them to length to place underneath the new panel and old cowl, along and covering the seams. This backed up the gap that is between the new and old pieces. You can’t see it but the spot welds were made from inside the cab on either side of the strip of metal. Here is the new piece clamped in with some of the spot welds showing.

The new cowl all spot welded in place from below. Next will be to weld along the line or gap between the old and new pieces.

Re: MS37 Cowl Vent Repair
Posted: Thu Feb 11, 2021 2:42 pm
by m-37Bruce
That is really shaping up perfect! How difficult was it wielding upside down?
Re: MS37 Cowl Vent Repair
Posted: Fri Feb 12, 2021 7:03 am
by sturmtyger380
It was interesting. I sat where the transmission cover would have been on a stool. I have this fiberglass welding blanket that I used to lay over my legs and lower body. That kept the spater from being bad on me. Having a auto darkening welding hood was a must. I would have to put the hood down and duck my head under the dashboard. It just took time to zap some and then move clamps around and zap some more. I would not have wanted this to be my first fabrication and welding project though. Plus I just have to walk away and let my head clear and my brain think of the next steps.
Re: MS37 Cowl Vent Repair
Posted: Fri Feb 12, 2021 12:21 pm
by m-37Bruce
Sounds like a PITA, but it is sure turning out nice, what welder are you using for this job?
Re: MS37 Cowl Vent Repair
Posted: Mon Feb 15, 2021 7:11 am
by sturmtyger380
I am using an old Century 100 mig welder with Unimix gas. It does a good job but with thin metal you have to be really careful in adjusting the heat and wire speed. You can really blow holes in sheet metal if you are not careful.

Re: MS37 Cowl Vent Repair
Posted: Mon Feb 15, 2021 1:11 pm
by m-37Bruce
I know about them blown holes, took a minute to learn about the speed and heat.