Page 4 of 5
Re: Replacing exhaust manifold (Building a header)
Posted: Mon Apr 11, 2016 1:45 pm
by isaac_alaska
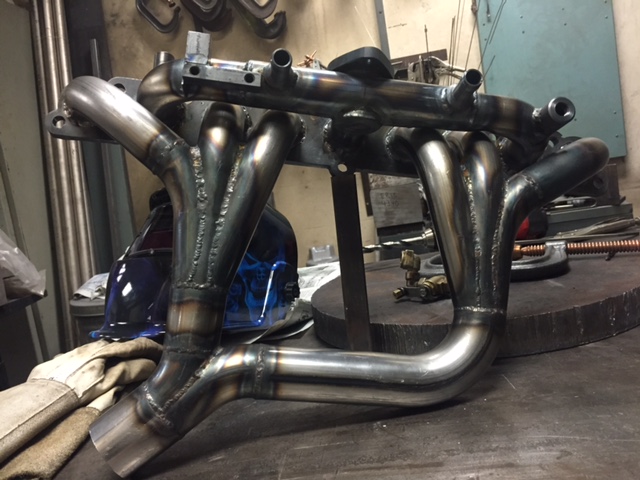
been a long time since i've posted, but i have made some progress! got it all finished up and welded a flange on the outlet (actually i made two flanges, so i can bolt the new pipe on) and now i'm considering buying a section of braided stainless to connect between the header and the pipe. reduce stress on the side of the block. i don't know if it's necessary but it might be a nice touch.

- IMG_2979.JPG (113.77 KiB) Viewed 3811 times
- IMG_2980.JPG (116.4 KiB) Viewed 3811 times
Found some really good (as far as i can tell) header paint made by Eastwood. "Eastwood high temp internal exhaust coating." It comes with a long tube so you can paint the inside of the tubes. i also did a full coat on the outside.

- IMG_3570.JPG (114.64 KiB) Viewed 3811 times
anyone want to hazzard a guess as to what i had fitment issues with?

Re: Replacing exhaust manifold (Building a header)
Posted: Mon Apr 11, 2016 4:49 pm
by RMS
thats purdy ....im going to say oil pump
Re: Replacing exhaust manifold (Building a header)
Posted: Tue Apr 12, 2016 4:36 am
by w30bob
Isaac,
That looks fantastic...........great job. Now you need to get it over to Andy for some dyno results! You may just find yourself in the header business!
Awesome job dude!
regards,
bob
Re: Replacing exhaust manifold (Building a header)
Posted: Tue Apr 12, 2016 2:34 pm
by isaac_alaska
Re: Replacing exhaust manifold (Building a header)
Posted: Tue Apr 12, 2016 3:09 pm
by kelley
Man that looks like a lot of work, GREAT JOB!
Re: Replacing exhaust manifold (Building a header)
Posted: Tue Apr 12, 2016 3:39 pm
by RMS
valves look easier to get to with that new header. the dump position looks perfect to shoot the pipe under the frame just behind the shackle.
great work man! what kind of muffler will you be running ?
Re: Replacing exhaust manifold (Building a header)
Posted: Tue Apr 12, 2016 4:16 pm
by w30bob
What kind of paint did you use? I need to find some header paint for a Cushman scooter I restored for my Dad and most of the "High Heat" paint I've found is pure crap. It would be nice to find something that can actually withstand heat.
thanks,
bob
Re: Replacing exhaust manifold (Building a header)
Posted: Tue Apr 12, 2016 8:20 pm
by isaac_alaska
thanks! it was a lot of work but i like to think of it as a learning experience!

i need to set the valves next, and run a line for the PCV valve. i was in such a hurry to get the manifold bolted on i skipped those steps...
haven't picked out a muffler yet, i was gonna go down to napa or O'reilly and see if they had something in stock that will fit up under the running board where i need it to fit, and then rout the exhaust pipe to fit.
the paint is Made by eastwood, they call it "internal exhaust coating" you can check it out
here. I should have it running again in the next few days (weeks?) and can see how well it holds up during use.
Re: Replacing exhaust manifold (Building a header)
Posted: Wed Apr 13, 2016 5:44 pm
by w30bob
Isaac,
Thanks. I checked out the site, read the reviews and watched the video. Seems like good stuff. How did you spray the outside..........does the extension tube simply pull off so you can spray without it.......or did you just spray with the tube and move it around the outside of the header?
thanks,
bob
Re: Replacing exhaust manifold (Building a header)
Posted: Wed Apr 13, 2016 8:09 pm
by isaac_alaska
The tube pulls off and the can works like conventional spray paint. Dries to the touch extremely quickly. Like a couple of minutes.
Re: Replacing exhaust manifold (Building a header)
Posted: Sun Apr 17, 2016 4:33 pm
by 52PLOWERWAGON
wow lookin' good

Re: Replacing exhaust manifold (Building a header)
Posted: Mon Apr 18, 2016 12:52 am
by isaac_alaska
Whoops. Left nipple hits the throttle linkage. Shoulda seen that one coming. One more cut and weld and it should be ready to fire up!
Re: Replacing exhaust manifold (Building a header)
Posted: Sun Apr 24, 2016 12:25 am
by isaac_alaska
moved the nipple about 2" towards the center of the manifold, just enough to allow it to sit outside the range of the throttle bellcrank. Everything lines up now, got the carb and air cleaner bolted back on, and of course had to fire it up just to see what would happen...of course this is without the muffler or PCV attached, and after the truck has sat outside all winter. Happily it cranked right up on the second press of the starter and within 30 seconds or so was running as good as ever! somewhat loud but that's to be expected...gotta find a muffler for it now! any problems with letting the exhaust exit in front of the rear passenger tire? it's either that or run it back up the side through the fording pipe like it's routed now.
Re: Replacing exhaust manifold (Building a header)
Posted: Sun Apr 24, 2016 8:53 am
by Jess
Isaac, That's some very nice work. For the exhaust dumping in front of the rear tire, mine was modified for civilian exhaust at the end of its service life and they just put a tailpipe that comes out to the side just ahead of the tire, I have never had any issue with it here but then I don't carry troops in the seats under canvas. The exhaust issue came up with the 5/4 ton GM trucks and we had to run with the sides rolled up if carrying anyone in the back due to CO buildup under the tarp. I don't think many of us will ever have that issue but its one to be aware of.
Looking forward to your posting pictures with all the bits back on.
Re: Replacing exhaust manifold (Building a header)
Posted: Sat Apr 30, 2016 10:37 pm
by isaac_alaska
Exhaust ran to the muffler, muffler mounted, right now exhaust just exits directly from the muffler but eventually I'll figure out where to run it. I forget who suggested it, somewhere in the "most practical mods" thread, to use a section of flexible braided stainless just after the manifold. Made it very easy to get everything just right! Even got the PCV valve mounted and routed and plumbed. I left off the fording valve for now, I think as long as I keep the block above waterline it's unecessary!
Here's a couple pics of the finished install

- PCV plumbed in with 3/8 steel brake line
- image.jpg (85.63 KiB) Viewed 3422 times
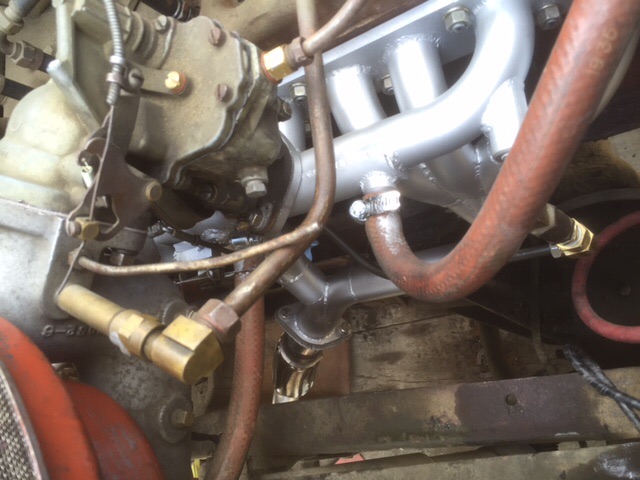
- Manifold water jacket, and flexy braided SS pipe
- image.jpg (86.99 KiB) Viewed 3422 times
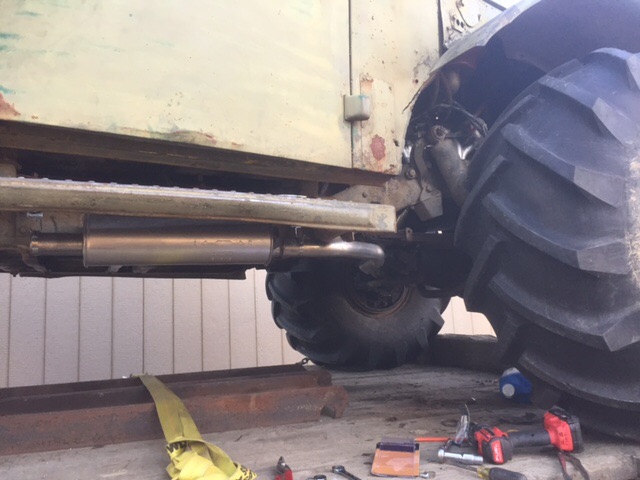
- Have to look closely for the flexible drop
- image.jpg (75.34 KiB) Viewed 3422 times