Page 3 of 5
Re: Replacing exhaust manifold (Building a header)
Posted: Wed Jan 27, 2016 9:14 pm
by ashyers
Issac,
Slick technique! I look forward to seeing the finished product. I'm REALLY curious to see how it works compared to the stock manifold in stock RPM ranges.
Andy
Re: Replacing exhaust manifold (Building a header)
Posted: Wed Jan 27, 2016 10:52 pm
by isaac_alaska
Thanks Andy! As far as i know this is the first time 3d printing has been used in this way for complex metalworking. It's probably been done somewhere..but i haven't seen it.
I'm very curious to see how it performs as well, if anyone has an engine ready to go on a dyno stand i would consider sending it out for testing, just to see how it compares

otherwise my testing will consist of driving it and going 'hmm yeah, that feels pretty good."
Here's a couple more pics of how the pieces fit together, the same template technique was used on the lower 2-1 collector as was used on each of the 3-1 collectors.
Here you can see the indentations on each side where the 2" collector meets the pair of 1.75" down tubes, these were done with a pair of special vice jaws to make welding a bit easier
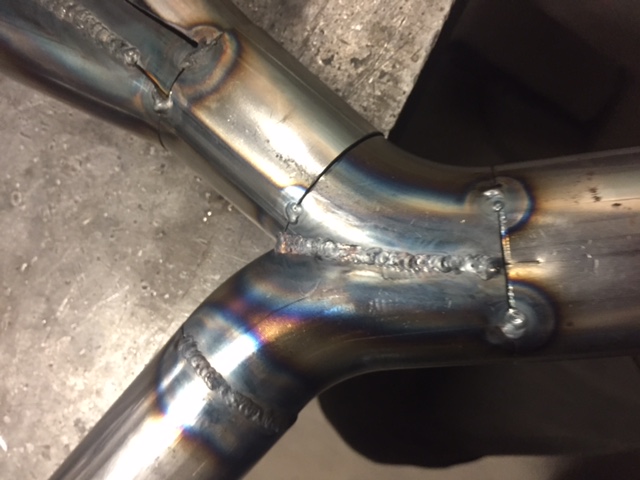
- IMG_2661.JPG (88.47 KiB) Viewed 2468 times
Pieces are mostly just tacked together here, though some of the "tack" welds are much longer than others. Still learning how to TIG weld.
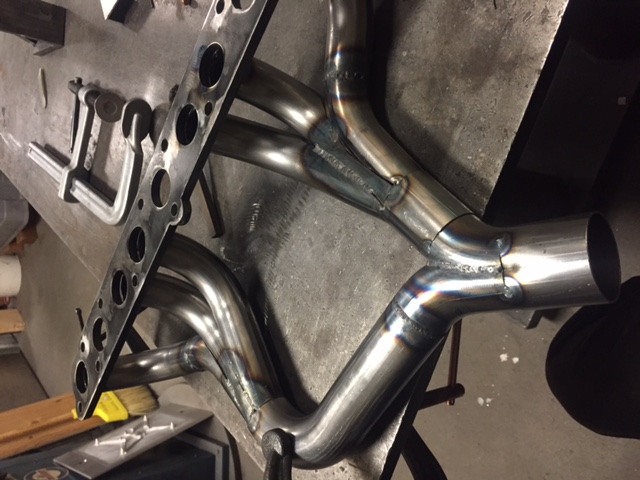
- IMG_2662.JPG (112.47 KiB) Viewed 2468 times
Test fit like this, the front tube comes too close to the fuel pump, but I am planning to remove the fuel pump anyway since the lines are already disconnected and run through an electric pump. The front tube of the rear set of 3 interferes with the PCV breather pipe, so the breather will have to be re-routed as well. Making notes if i build another.
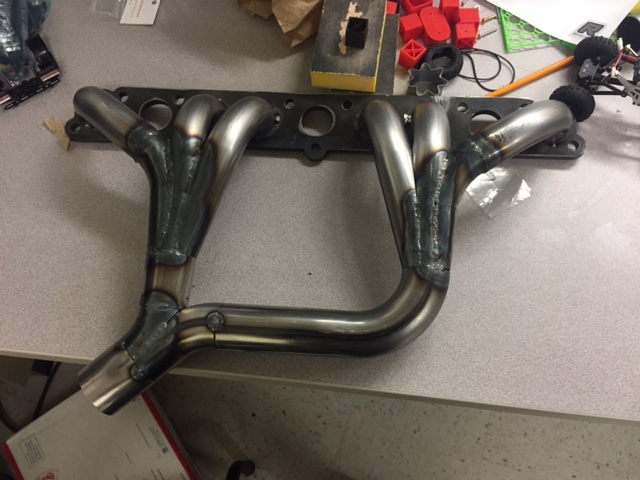
- IMG_2664.JPG (108.25 KiB) Viewed 2468 times
Re: Replacing exhaust manifold (Building a header)
Posted: Thu Jan 28, 2016 4:45 am
by T. Highway
Nice progress on the manifold.
Bert
Re: Replacing exhaust manifold (Building a header)
Posted: Thu Jan 28, 2016 7:30 pm
by isaac_alaska
Thanks! It's taken me most of the winter to build, but I've only been finding an hour or two at a time, a few times a week to work on it. Been trying to take enough pictures to document what I did and how I did it in case anyone else was interested in making one.
Used a tubing notcher tool for most of the cuts on the intake manifold, these things are extremely handy for making pieces of tube fit each other!
Cutting the intake runners to mate up to the intake collector/down tube. Again no filing or grinding to make these fit, just one cut and you get a near perfect match between the two parts.
- IMG_2806.JPG (135.49 KiB) Viewed 2454 times
Cutting the carburetor down-tube. I got a little ahead of myself and cut the piece of tubing to length before i cut the holes for the runners, so i had to tack it back onto a longer piece of pipe to hold it in the notching tool.
- IMG_2810.JPG (116.9 KiB) Viewed 2454 times
All fit together and ready to be welded in, the intake is at a slight upward angle to clear the exhaust tubes, and even then i had to make some small indentations along the back side of the intake tube to get enough room. I wanted to avoid mounting the carburetor any higher than the stock manifold located it. Mounting it higher might not have been a bad idea in hindsight, it may have helped smooth out the flow by having a longer down-tube. It would have also allowed the air cleaner to clear the lifted body on my truck. Oh well, I'll make that change next time.

- IMG_2813.JPG (96.99 KiB) Viewed 2454 times
Re: Replacing exhaust manifold (Building a header)
Posted: Wed Feb 03, 2016 5:48 pm
by kelley
Hi Issac,
Great job with the header, when I bought my M37 the manifold had a couple of good sized cracks. At the time I hadn't realized there were so many NOS manifolds out there so I also set out to build one. Mine is not nearly as exotic as yours, I made a close copy of the original. If I knew how to post pictures on this site, I would. I can email you the pics if you send me an address.
Thanks for posting all the nice work,
Kelley
Re: Replacing exhaust manifold (Building a header)
Posted: Wed Feb 03, 2016 7:56 pm
by xm708
Maybe a good manifold on your new truck is good ??
Re: Replacing exhaust manifold (Building a header)
Posted: Wed Feb 03, 2016 8:29 pm
by isaac_alaska
Kelley, I'd love to see your manifold! Address is nhfreeride (at) gmail (dot) com
If you want, I can post them in here.
I could have had a nos for just a bit more money (I only have a little over $120 in material in mine so far) but I jumped at the chance to learn how to build a header. Grad student, no money, and glad to work on something besides school

I tried to keep the important bits (carb location, throttle cable clamp, air cleaner elbow bracket mount) in the original spots, and took some liberty with the tube locations, outlet location, and PCV port.
More photos to come when I can get back to my laptop.
Re: Replacing exhaust manifold (Building a header)
Posted: Thu Feb 04, 2016 5:35 am
by just me
Hearing how expensive and hard manifolds are to get, I decided to pick one up if I could find one. At the last MV show, there was a nice complete one (Intake, exhaust, PCV, brackets, Upper exhaust, etc.) I scored for $20. Problem, for me, solved. (And he also had a very nice, only needs seals-I inspected, LU-4 winch for $200. Now replacing my very worn old one.)
If I hadn't found a good one cheap, I would have definitely built my own. And an intake for two ones or a single 2bbl.
Re: Replacing exhaust manifold (Building a header)
Posted: Thu Feb 04, 2016 10:25 am
by isaac_alaska
If I found one for $20 it would sure be hard to pass up! I am excited to see if the new curves and tubes are going to have any effect on the power. A couple horsepower would probably be noticeable
Here are a few pics that Kelley sent me, you have to look close to tell its not a stock manifold! Very very nice work, it looks great!
Re: Replacing exhaust manifold (Building a header)
Posted: Thu Feb 04, 2016 3:27 pm
by just me
Getting rid of the restriction from the heat riser should help greatly. I can feel a big difference opening and closing it. So, I run mine only partially open as a compromise.
Re: Replacing exhaust manifold (Building a header)
Posted: Thu Feb 04, 2016 3:40 pm
by jim lee
Great use for 3D printing! We started doing drilling fixtures when we got our first printer. For stuff like that they are unbeatable!
Here's two more you can print for your M37
 http://www.thingiverse.com/thing:1015269
 <- Float gauge for the M37 carb.
And of course, for holding your drink when doing the drive through burger thing..
 http://www.thingiverse.com/thing:907107
 <- Printable drink holder for M37
Love your pipes, they look great! I'd worry that your intake doesn't have enough roughness to hold fuel moisture. Might be a problem?
-jim lee
Re: Replacing exhaust manifold (Building a header)
Posted: Thu Feb 04, 2016 4:37 pm
by isaac_alaska
Did a little reading, and it seems that surface roughness is sometimes desired to help transfer heat from the manifold to the air fuel mixture, to help re-evaporate any fuel that may stick to the wall. I don't know how much roughess is desired. I guess testing will tell
Re: Replacing exhaust manifold (Building a header)
Posted: Wed Feb 10, 2016 1:00 pm
by isaac_alaska
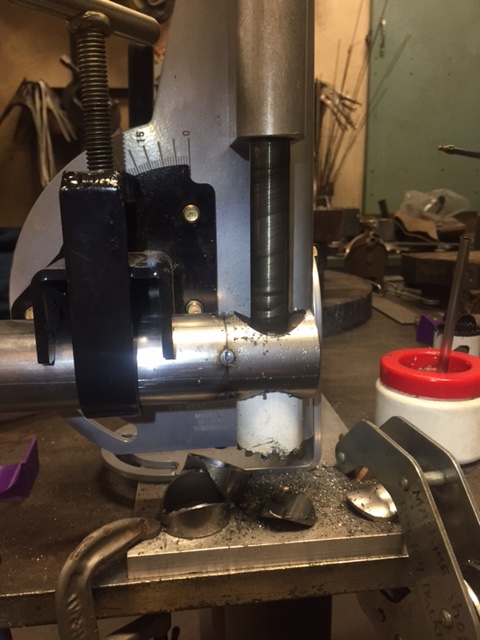
Some more photos, i used a piece of 3/8" plate to cut the carb flange from. used a mill to precicely locate and drill the main hole, and then drill and tap the two stud locations. The oval shape was cut on a bandsaw and then finished on a belt grinder, it's pretty easy to make it as accurate as you feel like marking, and the grinder lets you finish it to nice straight edges.
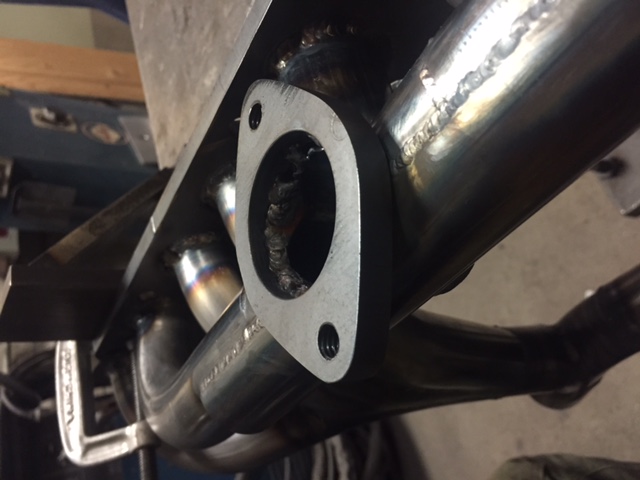
- IMG_2865.JPG (76.87 KiB) Viewed 2371 times
With the carb flange in place, i wanted to locate the air cleaner elbow mounting holes and throttle cable clamp mount, as near to the original locations as possible. For this, i cut one plate with two holes to bolt across the carb opening on the old manifold, and cut another plate to bolt across two of the cable clamp mount screws. Then, i bent a piece of heavy rod and welded it in place on both plates, so they were located in relation to each other.
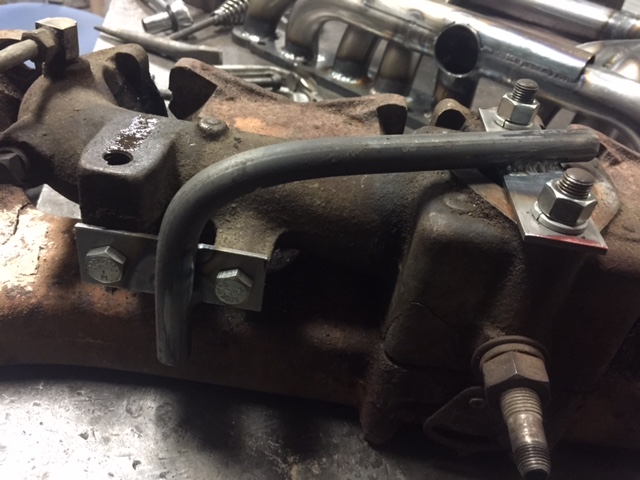
- IMG_2864.JPG (104.75 KiB) Viewed 2371 times
Finally, machined some threaded holes from a couple of pieces of bar stock, and then transferred the new pre-threaded mounts over to the new manifold, using the jig i created in the previous photo. All that's left to place the threaded holes is get a few tabs of scrap steel and weld between the manifold and solidly held threaded holes.

- IMG_2870.JPG (120.8 KiB) Viewed 2371 times
Re: Replacing exhaust manifold (Building a header)
Posted: Wed Feb 10, 2016 2:37 pm
by RMS
great craftsmanship Isaak. I like how it works with stock.
when will you start accepting orders

Re: Replacing exhaust manifold (Building a header)
Posted: Wed Feb 10, 2016 5:55 pm
by isaac_alaska
Thanks! I'm excited to see how it runs. I want to adjust valves before i install it. Since it's so easy to do with everything out of the way.
I'll accept orders as soon as I get the time down a little

haha
At this rate if I paid myself $1/hr it would almost be cheaper to buy NOS. But then it wouldn't have the same "cool" factor